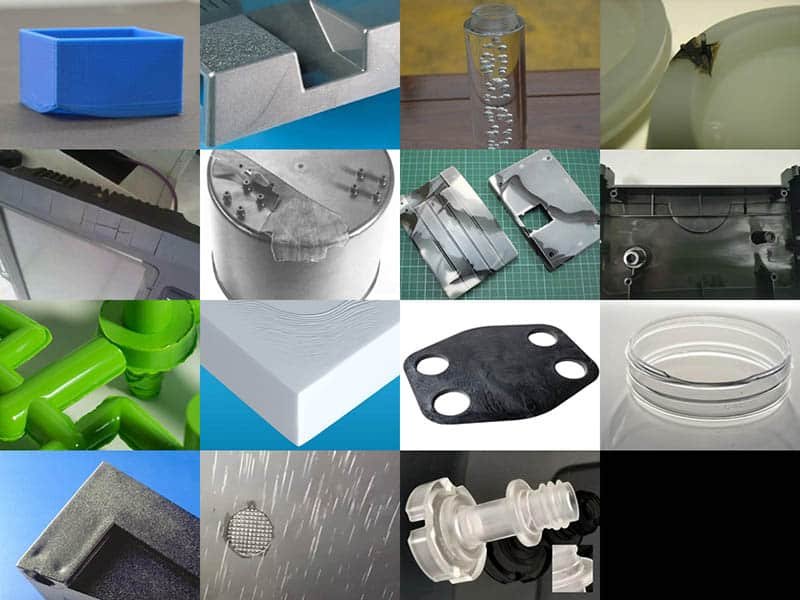
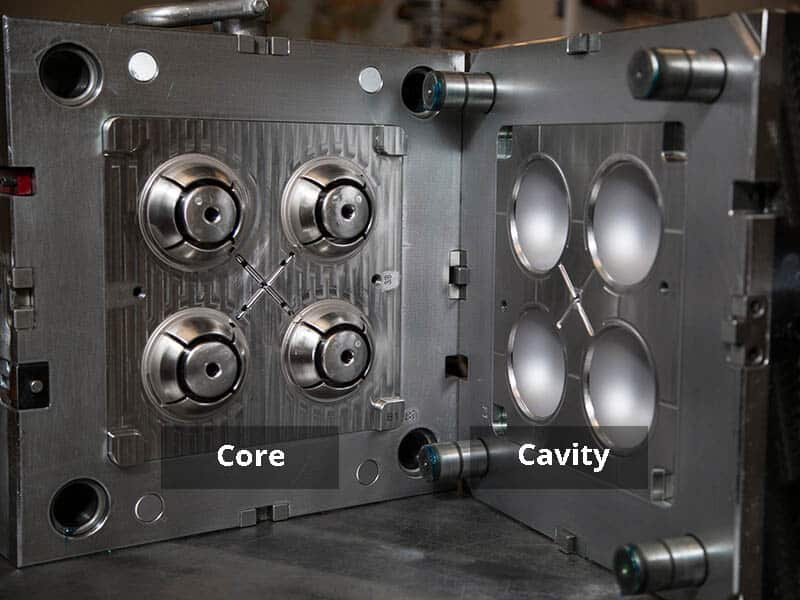
Injection molding enabling the mass production of complex plastic parts with high precision and efficiency. However, it also comes with challenges, and one of the most common is dealing with injection molding defects during production.
The common defects in injection molding can range from minor cosmetic imperfections to significant structural issues that compromise the functionality of the part. Even small flaws can lead to product recalls, increased scrap rates, and additional costs for rework or material waste. In industries where precision and reliability are non-negotiable, such as aerospace or healthcare, even the slightest defect can have serious consequences.
This article describes the common plastic injection molding defects (listed below) and provides info about their causes and remedies.
Surface Defects
- Flow Lines
- Sink Marks
- Weld Lines
- Jetting
- Burn Marks
- Air Bubbles
- Ejecting Mark
- Splay Mark
Structural Defects
- Short Shots
- Flash
- Warpage
- Cracking
- Vacuum Voids
Material Related Defects
- Discoloration
- Delamiation
Flow Lines
Flow lines are streaks, patterns, or lines visible on the surface of a molded part, often appearing as off-color or wavy marks. While they may not always affect the part’s functionality, they can be unsightly and indicate underlying issues in the molding process. Flow lines occur when the plastic flows through the mold at varying speeds or cools too quickly during the injection process. This can be due to low injection speeds, low melt temperatures, or sudden changes in the mold’s geometry, such as sharp corners or flow restrictions that disrupt the smooth flow of material.

How to Fix Flow Lines
- Increase injection speed and pressure to ensure the mold fills before the material cools.
- Raise the mold and melt temperature to maintain consistent flow.
- Smooth out sharp corners or abrupt changes in the mold design.
- Relocate the gate to promote more uniform material flow.
Sink Marks
Sink marks are small depressions or indentations on the surface of a molded part, typically appearing near thicker areas of the part. These defects are caused by uneven cooling and shrinkage during the injection molding process. When the material cools, the thicker sections take longer to solidify than the thinner sections, leading to a depression as the material contracts. Sink marks are not only visually unappealing but can also compromise the structural integrity of the part in some cases.

How to Fix Sink Marks
- Reduce the wall thickness of the molded part to allow for more uniform cooling.
- Increase the mold temperature to improve heat distribution and reduce shrinkage.
- Adjust the packing pressure and time to ensure that the mold is fully packed.
- Use a thicker gate to allow material to flow more evenly into the mold.
Weld Lines
Weld lines, also known as knit lines, occur when two flow fronts of molten plastic meet but fail to fuse properly. This can result in visible lines or scars on the surface of the molded part. Weld lines are typically weak points in the part and can affect its strength, durability, and appearance. These lines are most often seen in parts with complex geometries or where there are multiple entry points for the material.

How to Fix Weld Lines
- Increase mold temperature to help improve material flow and fusion.
- Adjust injection speed to ensure a smoother, more consistent flow of plastic.
- Modify gate placement to direct flow fronts to meet at more favorable angles.
- Improve packing pressure and time to ensure proper material fusion at the weld line.
Jetting
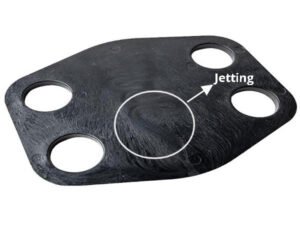
Jetting occurs when molten plastic flows too quickly into the mold cavity, causing it to form a thin, uneven layer of material that cools and solidifies in a “jet-like” shape. This defect typically results in visible, raised areas on the part surface and can affect both the cosmetic appearance and the structural integrity of the part.
How to Fix Jetting
- Reduce injection speed to allow for a more controlled flow of material into the cavity.
- Increase mold temperature to prevent premature cooling and solidification of the plastic.
- Adjust the nozzle or gate design to better control the entry of molten plastic.
- Ensure the proper venting to avoid trapped air, which can also contribute to jetting.
Burn Marks
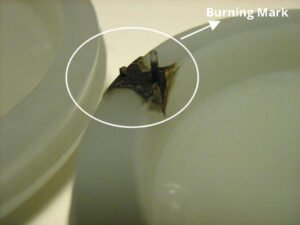
Burn marks are a common injection molding defect that appears as dark spots or discolorations on the surface of molded parts. These marks are caused by excessive heat buildup or trapped air in the mold cavity during the injection process. When air or moisture is trapped, it can combust due to high pressure and temperature, leaving visible burn marks on the part. The areas near the injection gates are often the most susceptible to burn marks, as the material first enters the mold cavity and experiences the highest pressure.
How to Fix Burn Marks
- Improve mold venting to allow trapped air and gases to escape during the injection process.
- Reduce injection speed to control the flow of the molten plastic and prevent overheating.
- Lower mold temperature to minimize the heat retention in the cavity that can lead to burn marks.
- Ensure that the plastic material is properly dried before injection to prevent moisture-related burns.
Air Bubbles
Air bubbles, also known as gas traps, are small pockets of trapped air that appear in molded parts. They usually show up as small, round depressions or blisters on the surface of the part. These bubbles are caused by air becoming trapped in the mold cavity during the injection process, often due to poor venting, fast injection speed, or insufficient mold temperature. When the air cannot escape, it gets compressed and causes bubbles or voids inside the part.

How to Fix Air Bubbles
- Ensure proper venting in the mold to allow air to escape during injection.
- Reduce the injection speed to give the plastic more time to fill the mold and release trapped air.
- Increase mold temperature slightly to improve the flow of the plastic and minimize the chances of trapping air.
- Use higher-quality, well-dried materials to prevent moisture-related gas formation during the process.
Ejecting Marks
Ejecting marks, also called ejector pin marks, are visible blemishes left on the surface of molded parts when the ejector pins are used to remove the part from the mold. These marks can appear as circular depressions or indents on the part’s surface, often located around the edges or where the ejector pins make contact. They are caused by the pressure applied by the ejector pins during the ejection process, especially if the mold design or part geometry does not allow for smooth removal.

How to Fix Ejecting Marks
- Modify the mold design to incorporate more even distribution of ejector pins to minimize localized pressure.
- Use a soft, uniform ejection force to avoid leaving marks on the part.
- Opt for the use of more advanced ejection systems that ensure smooth and gradual ejection of parts.
- Consider adjusting the temperature of the mold or the material to make the part more pliable during ejection, reducing the risk of deformation.
Vacuum Voids
Vacuum voids, also known as air pockets or gas traps, occur when air or gas becomes trapped inside the mold cavity during the injection process. These voids can form when the mold isn’t properly vented, or when the material flows too quickly, preventing air from escaping. As a result, the trapped air forms small pockets that lead to hollow spots or bubbles within the molded part, affecting the integrity and appearance of the final product.
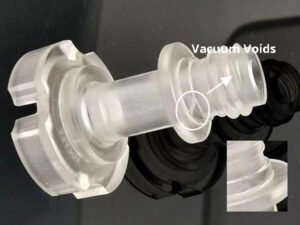
How to Fix Vacuum Voids
- Improve mold venting by adding more venting channels or improving their placement to allow air to escape.
- Slow down the injection speed to allow the material to flow evenly and prevent air from being trapped.
- Use materials with lower viscosity to allow for smoother flow and reduce the likelihood of air entrapment.
- Ensure proper mold alignment to minimize gaps that can trap air during the injection process.
Splay Marks
Splay marks, also known as silver streaks or surface streaks, are visible lines or patches on the surface of the molded part that appear as a result of the material being subjected to excessive heat or moisture. These streaks typically have a silvery or shiny appearance and can be a cosmetic issue, compromising the overall quality and finish of the part. The formation of splay marks is usually caused by moisture in the plastic material, improper drying, or an excessively high injection temperature that causes the material to degrade. In some cases, the screw speed in the injection molding machine may be too fast, causing air to be trapped and creating the streaks.
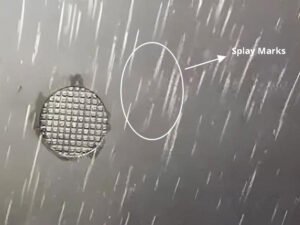
How to Fix Splay Marks
- Ensure that the material is properly dried before injection to remove any moisture.
- Adjust the injection temperature to prevent excessive heat that could degrade the material.
- Reduce the screw speed to prevent air entrapment and excessive shear stress.
- Use a different plastic material that is more resistant to moisture and heat sensitivity.
Short Shots
Short shots happen when the injection molding process fails to completely fill the mold cavity, leaving part of the cavity unfilled. This defect often results in incomplete or partially formed parts, which may have missing sections or rough edges. The primary causes of short shots include insufficient injection pressure, inadequate injection speed, or problems with the mold design itself, such as narrow channels that prevent material from flowing properly. Additionally, if the material is not heated properly or is too thick, it may not flow easily into all areas of the mold, contributing to the short shot. This defect can significantly affect the functionality and aesthetics of the part, leading to the need for reworking or discarding the produced item.

How to Fix Short Shots
- Increase the injection pressure to ensure the material fills the cavity completely.
- Adjust the injection speed to allow the material to flow more smoothly into the mold.
- Check the mold design for any areas that may cause flow restrictions and adjust accordingly.
- Ensure that the material is at the correct temperature to facilitate proper flow and filling.
Flash
Flash refers to the unwanted excess material that escapes from the mold cavity during injection molding. It typically appears as thin, sharp edges around the part, often in areas where the mold parts do not fully close. This defect occurs when too much pressure is applied during the injection process or when there is inadequate clamping force to hold the mold halves together. Flash can also be caused by worn or damaged molds, misalignment of the mold components, or improper material injection rate. While flash is generally considered a cosmetic defect, it can also affect the functionality of the part if not properly removed.

How to Fix Flash
- Increase the clamping force to ensure the mold is tightly closed during injection.
- Adjust the injection pressure to avoid over-packing the mold cavity.
- Check for mold wear and replace or repair damaged parts.
- Inspect and adjust the mold alignment to ensure accurate closure.
- Use the correct material and ensure it has the right viscosity for molding.
Warpage
Warpage occurs when a molded part distorts or bends after ejection from the mold. This defect can result in parts that are out of shape, which makes them difficult or impossible to assemble or fit with other components. Warpage is typically caused by uneven cooling, where one part of the mold cools faster than the other, creating internal stresses. It can also be influenced by factors such as mold design, material selection, or the thickness of the part. Thin or uneven walls are especially susceptible to warping, as is the case when the cooling system in the mold is not properly designed or balanced.

How to Fix Warpage
- Ensure uniform cooling throughout the mold by optimizing the cooling channels and cycle times.
- Use mold materials that can withstand thermal stresses and maintain even heat distribution.
- Adjust the injection speed and pressure to avoid introducing excess material.
- Modify part design to reduce thickness variations, especially in critical areas.
- Use a post-molding process, such as heat treatment or controlled cooling.
Cracking
Cracking refers to the formation of visible fractures or splits on the surface or inside of a molded part. This defect often occurs during or after the injection molding process and can compromise the strength and functionality of the part. Cracking can be caused by a variety of factors, such as excessive injection speed, improper cooling, or the use of an incorrect material that is too brittle. The type of plastic material used, particularly its resistance to stress and temperature, plays a significant role in the likelihood of cracking. Additionally, inadequate mold design and issues with the mold’s temperature regulation can exacerbate this defect.

How to Fix Cracking
- Choose more suitable materials with higher impact resistance or flexibility to reduce brittleness.
- Optimize injection speed and pressure to ensure the material flows smoothly and evenly.
- Adjust the cooling time to ensure uniform temperature distribution throughout the part.
- Improve mold design to reduce stress concentration, such as adding fillets or eliminating sharp corners.
- Conduct thorough testing for material compatibility and stress limits before production.
Discoloration
Discoloration in injection molded parts refers to the unwanted change in the color of the material, often resulting in uneven or blotchy coloring. This defect can be caused by a variety of factors such as overheating of the material, contamination, or the degradation of the plastic during the molding process. Prolonged exposure to high temperatures can cause the material to break down and change color, while the use of incompatible colorants or additives may lead to uneven coloring. Contamination from residues, oils, or previous batches in the mold or equipment can also cause discoloration.

How to Fix Discoloration
- Control temperatures to prevent overheating and maintain consistent processing.
- Clean molds and equipment regularly to avoid contamination from previous batches.
- Choose compatible, high-quality colorants and additives to prevent degradation.
- Adjust material residence time in the barrel to minimize overheating.
- Perform routine maintenance to keep molds and machines in optimal working condition.
Delamination
Delamination is a common plastic defects occurs when the layers within a molded part fail to bond properly, resulting in visible cracks or gaps. This defect can compromise the structural integrity and appearance of the part. It often happens when bonding conditions during injection molding are disrupted. The causes include insufficient mold temperature, incompatible materials, contamination, incorrect injection speed, and excessive moisture content.

How to Fix Delamination
- Increase the mold temperature to ensure proper bonding of material layers.
- Use compatible materials that bond well to each other.
- Clean the molds regularly to prevent contamination.
- Adjust the injection speed and pressure to promote uniform material flow.
- Dry materials thoroughly before use to reduce moisture content.
Comparison of Injection Molding Defects
To effectively address injection molding defects, it’s essential to not only understand the causes and symptoms but also to have a clear strategy for resolving them. In the following table, we summarize the key defects, their causes, and how they typically manifest on molded parts.
| Defect Type | Cause | Appearance |
|---|---|---|
| Flow Lines | Flow of material is uneven or too fast | Visible lines or streaks on the surface of the part |
| Sink Marks | Uneven cooling and shrinkage, especially on thicker areas | Dimpled or sunken surface areas |
| Weld Lines | Incomplete fusion between two flow fronts | Visible lines or marks where two flow fronts meet |
| Jetting | Excessive injection speed causes material to splatter | Smooth, wavy surface with irregular material flow |
| Air Bubbles | Trapped air during injection | Small air pockets or bubbles on the surface |
| Ejecting Marks | Imprint from the ejector pins or other ejection system | Small indentations or marks on the part's surface |
| Vacuum Voids | Inadequate air removal during molding | Small, hollow areas within the part |
| Short Shots | Insufficient material injected or premature solidification | Partially formed product, often missing sections |
| Splay Marks | Moisture or contamination in the material | Blotchy, streaked areas on the surface |
| Flash | Excess material overflow between mold halves | Thin film of material around the edges of the part |
| Warpage | Uneven cooling, uneven material flow | Bent or twisted parts, often noticeable after ejection |
| Discoloration | Overheating, material degradation, or contamination | Color changes or patches on the part's surface |
| Delamination | Incomplete bonding of layers or contaminants in material | Separated layers, especially near edges |
In summary, understanding and addressing injection molding troubleshooting is key to ensuring high-quality products and smooth production processes. By recognizing common defects and their causes, manufacturers can take proactive steps to minimize risks and improve efficiency. At Erye, we’re here to help you navigate these challenges and optimize your injection molding processes. With our expertise, we can support you in reducing defects and achieving the best outcomes for your projects. Get in touch with us!

